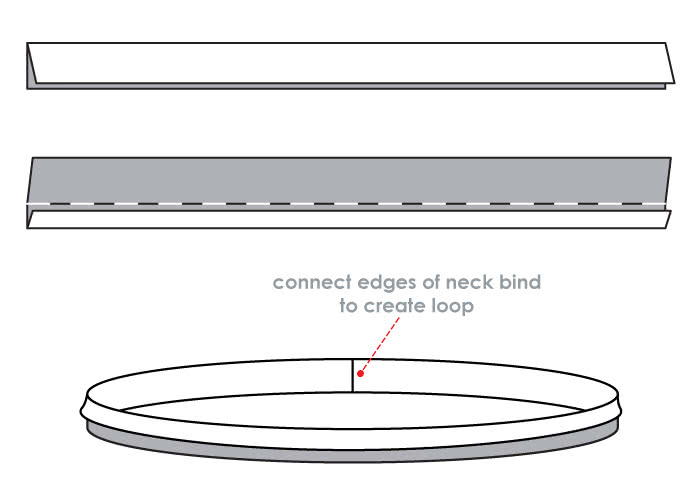
Home » Without Label » How To Sew A V Neck Binding / 6 Ways To Sew A V Neck In A Dress Top Sew Guide / 2) fold the binding in half lengthwise, wrong sides together.
How To Sew A V Neck Binding / 6 Ways To Sew A V Neck In A Dress Top Sew Guide / 2) fold the binding in half lengthwise, wrong sides together.
How To Sew A V Neck Binding / 6 Ways To Sew A V Neck In A Dress Top Sew Guide / 2) fold the binding in half lengthwise, wrong sides together.. You can sew in one continuous pass, or if you'd like to be extra careful you're not distorting the neckline, you can sew the two sides of the v neckline separately like before. Start/stop about 2 (5cm) from the center front making sure stitches to not go past center front mark. 6) clip the v point on the body, stopping exactly at the stitching. How to sew the v neck on the renfrew top. This will pull the neckline in nice and tight preventing sagging!
Starting at the back shoulder, pin the binding to the neckline, right sides together. In the pattern instructions, this is sewing step 4 and 5. Give the neckline a good press and you are all done! This is the most requested tutorial we haven't done yet, so here it is! Use your hand wheel to drop your needle down on the guideline you drew in earlier exactly on center front, and sew along the line until you reach center back.
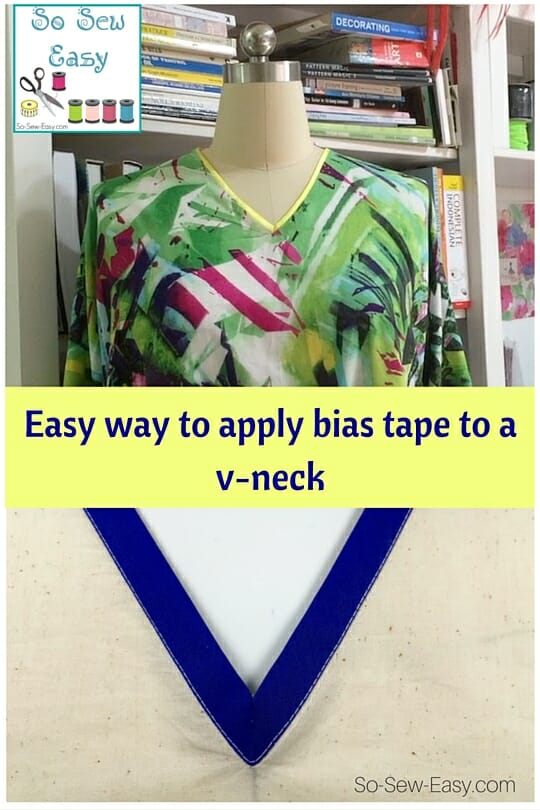
Easy Way To Apply Bias Tape To A V Neck Tutorial So Sew Easy from so-sew-easy.com Start sewing the band to the neckline along the seam allowance. Pin the binding even with the edges along the long side of the vs and stretch it slightly across the back of the neck so it will hug the neck and not stand straight up. Note that the pinning, and first pass of stitching, ends several inches above the point of the v on the left side. The printed knit top has a neckband sewn onto it. When you get to the v, straighten out the fabric so that the v notch lines up with the binding. Subscribe now for sewing videos: 1) cut a strip of fabric 1 1/2 inches wide. 2) fold the binding in half lengthwise, wrong sides together.
Using bias binding to finish an armhole is a popular finish for sleeveless tops, all the raw seams are all enclosed leaving a lovely neat result.
Checkout the post on facings for more details on this. Press open to reduce bulk. Then fold seam allowance of one of the edges & press. Make short stay stitches about 1⁄2 inch (1.3 cm) from the raw edge of the neckband. Using bias binding to finish an armhole is a popular finish for sleeveless tops, all the raw seams are all enclosed leaving a lovely neat result. Use your hand wheel to drop your needle down on the guideline you drew in earlier exactly on center front, and sew along the line until you reach center back. Line up the raw edges of the v on the shirt with the raw edges of the binding and pin in place. Stitch around the entire neckline (starting and ending at the center back) right along the fold of your binding. Today, i have a tutorial that's been requested several times: You can sew in one continuous pass, or if you'd like to be extra careful you're not distorting the neckline, you can sew the two sides of the v neckline separately like before. Sew the binding to neckline, using a stretch stitch. 3) with right side of the binding facing the wrong side of the garment, stitch the binding to the edge. One way is to overlap the band at the point of the v.
The stay stitches keep the neckband in place so it's easier to position it around your garment's neckline. Starting at the back shoulder, pin the binding to the neckline, right sides together. How to get a nice v on a knit v neckline. Checkout the post on facings for more details on this. Line up the raw edges of the v on the shirt with the raw edges of the binding and pin in place.
Binding Tutorial Sewing Tutorials Style Arc from www.stylearc.com There are many different types of interfacing but the fusible. Scrubs are one thing that i always thought should be an easy sew, but pattern companies have failed me. It should be longer than the opening you are sewing it to. 3) with right side of the binding facing the wrong side of the garment, stitch the binding to the edge. The technique is exactly the same. Mostly they are ok, but the neckline finishes that they use are disappointing at best. Begin pinning the bias strip to the neckline, easing the strip as you go. This is the most requested tutorial we haven't done yet, so here it is!
Line up the tip of the v on the binding with the top of the v of the shirt, matching the pivot points in the two baste stitch lines.
Then, wrap the binding around the seam allowance, pinning in place, and stitch again, right next to (or even on) the seamline. Use these tips to help create the best finish for your handmade garment. For these finishes, keep in mind that you are using fabrics that stretch. 2) fold the binding in half lengthwise, wrong sides together. Note that the pinning, and first pass of stitching, ends several inches above the point of the v on the left side. 1) cut a strip of fabric 1 1/2 inches wide. Pin in place slightly stretching the bias binding as you pin. They must end exactly at the mark. Fold binding in half lengthwise & press. You can sew in one continuous pass, or if you'd like to be extra careful you're not distorting the neckline, you can sew the two sides of the v neckline separately like before. Facing is another great way to finish a neckline along with bias binding and lining. Line up the raw edges of the v on the shirt with the raw edges of the binding and pin in place. 4) turn the binding to the right side of the garment, folding along the seamline.
Finally, how long should you make your neckband or neck binding? Things learned from this diy : Begin pinning the bias strip to the neckline, easing the strip as you go. There are a couple of ways to do it. Line up the raw edges of the v on the shirt with the raw edges of the binding and pin in place.
How To Apply Bias Binding As A Facing To A V Neck An Excerpt From My Refashioners 2016 Jeanius Project Wendy Ward from wendyward.files.wordpress.com Sew the binding to neckline, using a stretch stitch. This will pull the neckline in nice and tight preventing sagging! Also, when you fan the slit out, the fabric will get wavy, just pin on the bias binding and sew slowly. You can sew in one continuous pass, or if you'd like to be extra careful you're not distorting the neckline, you can sew the two sides of the v neckline separately like before. Facings are pieces of fabric that follow the shape of the neckline. 5) pivot the neckline trim to your left hand side and sew the neckband to the neckline with 3/8 (1cm) seam allowance. Use a walking foot if you have one, and don't stretch the fabric as you sew. Subscribe now for sewing videos:
After you get the slit bind, you sew the front shoulders to the back shoulders and then bias bind the remaining neckline in a circle.
Cut the excess fabric off on the wrong side of the neckline, and your binding is complete. Mostly they are ok, but the neckline finishes that they use are disappointing at best. Place a pin vertically (perpendicular to the seam) directly through the pivot point. Note that the pinning, and first pass of stitching, ends several inches above the point of the v on the left side. Sew the binding to neckline, using a stretch stitch. There are many different types of interfacing but the fusible. Starting at the back shoulder, pin the binding to the neckline, right sides together. The second, striped top has a neck binding. Press open to reduce bulk. Stitch around the entire neckline (starting and ending at the center back) right along the fold of your binding. Begin pinning the bias strip to the neckline, easing the strip as you go. 5) pivot the neckline trim to your left hand side and sew the neckband to the neckline with 3/8 (1cm) seam allowance. Learn how to clean finish a v neck using bias tape to the inside.